Wednesday, September 28, 2011

Fluffing our Empty Nest

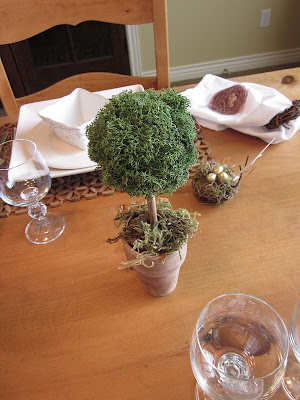
We just got back from taking both of our kids to college.  It's a very strange feeling to be empty-nesters!  In the spirit of this, I came up with this simple "nest-themed" tablescape.


 I used my Mom's silver.  She purchased it piece by piece when she was 18.  I am so thrilled to have it!


I found these square bowls at TJMaxx on clearance.


I found this nest at Twig.   I LOVE her stuff!


I made these napkins this summer.  HERE  is the link to learn how I made them.  Jane at Cottage at the Crossroads told me about the grapevine napkin rings she found at Hobby Lobby.  I think they look great and were really cheap there!   (on sale for $1.25 for six!)


I made these topiaries a few weeks ago.  HERE are the directions for making them.


I found these birds at TJMaxx for $1.99 each.  


A little bit of brown paint and they look so much better!


I have to keep the doors closed if I have the table set so Bailey the cat doesn't come in.  :)  He is sure the table is set for him! 


Thank you so much for visiting!

Pam


I am linking to the following parties:


Floor Resurfacing the Right Way

It’s an inescapable fact that the relatively simple task of resurfacing floors is often confused and considered interchangeable with the process of refinishing floors. Neither job is particularly pleasant but unlike refinishing, resurfacing is something that an ambitious amateur could undertake and likely succeed at. Here are some simple A-Z steps you can take to ensure that the job gets done right.


Prepping Your Room:

What’s the first thing a painter needs? A blank canvas! Any furniture or rugs should be moved out of the room you’re working on.  The smartest move would be to put it in another room but if you simply don’t have the space, rent a small moving truck or van for the day (U-Haul works fine). Once you’ve cleared the room, give it a solid sweeping and mopping. Be as thorough as possible to ensure a clean workspace.

The Buff ‘n’ Shine:

Now, it’s time to rent a buffer. Most day rentals for buffers hover around $30. Ask an employee to give you a general overview of how the machine works. It’s a relatively easy machine to work with but it’s also helpful to know how to maintain and clean it. Once you start buffering, be sure to go over the area at least two or three times. Depending on the size of the room, it will take you anywhere from 20 minutes to an hour to complete. Top it off with another good sweep.

Pick and Apply:

Waterborne finishes are safer and quicker than any other option, and they are more scratch resistant, making it a clear choice for pet owners. Waterborne finishers are also the most environmentally friendly finishes on the market (low on volatile organic compounds). Each waterborne coat takes only an hour to dry. You will have to apply more coats than with oil-based finishes but it’s worth it in the long run; three coats should be sufficient. When it’s fully dried, give the floor one last sweep and that’s that.

Hiring Out:     
Resurfacing is not a job that every person wants to roll up his or her sleeves for. Time restraints or the stress inherent in any home improvement project may make hiring a flooring specialist or contractor a more viable option for you. If so, consider these questions when interviewing prospective contractors.

1.     How long have they been in business? Over three years is best.

2.     Do they have a timetable? They should have a secure idea of the amount of time needed.

3.     How do they stand with past customers? Ask around and get an idea of their track record.

The job should not take longer than two days. Doing it yourself will run you anywhere from $100 to $200 while hiring a professional will run you anywhere from $300-500. When Click and Improve handles a job like this, we demand a pre-set schedule and price. So, you should expect the same if/when you hire a contractor or service provider.

Don’t be shy to call up a professional and ask about when it’s safe to move furniture back in, as it can vary depending on the finish. Once every thing is back in, you can admire and take pride in your floors, which should be ready for several more years of use and abuse.  

Tuesday, September 27, 2011

Avoiding That Sinking Feeling


If I were to sit here and type out every option available when it comes to bathroom faucets, this post might run the length of Moby Dick. Technologies advance, trends change, and handymen, plumbers and contractors install new, uniquely designed sinks every single day. The choices of faucets are innumerable but the bathroom sink is a central part of the bathroom and home improvement professionals of all sorts will tell you that the days of everyone installing the same simple sink unit with a vanity mirror and cabinets underneath are over. There are new ways to save room, ensure a more modern and stylish design, and make cleaning a breeze. Here are three or four options to consider talking over with your local NYC plumber.


·      On the Wall: Sinks attached directly to the wall are becoming popular for several reasons, not the least of which being that they cut down on the instances of plumber’s crack. There’s a minimalist bent to this that makes it easy to see leaks and to keep your bathroom clean. It gives off a spacious look as well and allows you to think of new, fun ways to design storage for your hygiene and medical supplies. Bad news: You need to think about new storage ideas…now.

·      Vessels: Vessel sinks, which essentially sit on your countertop like a large bowl with a faucet, convey a sense of containment. This means less clipped hairs from shaving and excess water from washing on your countertop. They also look incredibly nice and personalized. They are also very large and take up a lot of the countertop. Investing in some reasonably priced, wall-mounted holders for your toothbrushes, soaps, floss can solve this problem, and face washes.

·      Consoles and Pedestals: Like the vessel sink, the console conveys a sense of personalized attention. The sink is attached to the wall but has a set of legs going to the floor that are used for support. They are very classy looking and it’s only slightly harder to clean than the wall sink. There are also pedestal sinks that essentially do the same thing but with one thick stand that offers support and is attached to the wall as well. If you do chose this one, be sure to discuss it with a plumber or home improvement professional, as pedestals are a bit harder to install.  

Any of these options are easy enough to plan with a plumber but you might consider undertaking this project while remodeling other parts of your bathroom and get it all done in one fell swoop. I am a huge fan of console sinks: They look classic and give the room a stylish yet open feeling. In fact, I recommended a console sink to my cousin last month and am happy to report that she just recently got one installed. She will not stop raving about it. But, as always, different strokes for different folks.

Please Excuse me...

...While I load photos. 

Lauren Liess Textiles from top to bottom:
Queen Anne's Bouquet in Black & Oatmeal
Fern Star in Olive
Filigree Chevron in Black & Oatmeal
Ticking in Beige
Live Paisley in Gold
Happikat in Olive/ Aqua
happikat in Cocoa & Oatmeal
Live paisley in Antique Beige
Ticking in Black & Oatmeal

Like I mentioned, loading the photos of the fabrics onto my online store is taking foreverrrrrr.   (Yes, I'm complaining ;)  But I'm almost done and as soon as I am, we can launch!!  (All fabrics will be available for purchase online.)  I'll keep you posted but I'm tying to spend as much time as possible on the website so my posts may be short for a little bit.

Have a great day!!

xoxo, Lauren

If you'd like help creating a home you absolutely love, contact me about our design services.

Sunday, September 25, 2011

Italian Alphabet Tray

I am having fun with Citrasolv projects again this week!  I found this neat Italian alphabet graphic at The Graphics Fairy.
Photobucket


I flipped the image in Picnik by going to the Rotate Tab.


Did you notice that there is not a "J" or a "W" in this?  Hmmm....  :)


I used Citrasolv (purchased at Whole Foods). I put gloves on and did the project in the garage so it wouldn't smell up the house.


I taped the graphic to a pine board my husband had glued up for me.


Because this wood was very smooth, the graphic went onto the wood without any problems by just using a paper towel to apply the Citrasolv to the paper.  I still used the plastic tool to rub it, but almost didn't need to. The right side looks really smudged in these pictures, but doesn't look that bad in person.


I let the piece dry for a couple of hours so the graphic would be set in the wood.


I then applied Puritan Pine stain with a foam brush.  I wanted to stain it before assembling it so I wouldn't have any missed spots. 


You can see where the stain looks a little different in some spots.  I was ok with that because I wanted some 'character' on this piece.  With soft woods like this pine, to get an even application, you should first use a wood conditioner.  


 I stained the edges before they had the final cuts.  The one really long piece was cut to size once we put the piece together.


Some wood glue, a finish nailer and this framing contraption got it all into place.  If you don't have a framing contraption, you will be fine! 


I used a foam brush and applied this clear satin polyurethane to the whole piece. 


I let it dry for a couple of hours then attached the handles on the sides.


And here's the finished product:


Thanks so much for coming by.

Pam


I am linking to the following parties:


The Graphics Fairy


Friday, September 23, 2011

Milk off the Shelf

THIS is what happens when your house is under construction, you make dinner with the kids and your spouse is working late for the night:


...Was wondering this morning how in the world we could have finished off a whole gallon of milk yesterday?  (The kids got oatmeal with water for breakfast.)...

...Until my assistant came in and asked me why the milk was on the shelf???
(I really didn't even notice it there.)  Ah vell.
Off to the grocery store!

xoxo, Lauren

ps- I'll be sure to post a few progress pics of the rooms we had redone!  (Undecorated as of now)

Thursday, September 22, 2011

Taking A (Proverbial) Bath

With a few notable (and largely private) exceptions, the bathroom is still largely considered a place where one goes to be alone. It’s a place of personal business, things we don’t really like to talk about. More and more, however, I have found myself talking to friends who are planning or have already completed remodeling jobs that distinguish the bathroom as a place of utmost comfort and even luxury. To be perfectly frank, these are not always cheap fix-ups. However, it won’t be long until they are as normal as getting a new tub or new fixtures put in.

Below, you’ll find some of the more interesting and provocative advents that have become popular as of late and piqued my interest particularly. With the amount of fresh and modern ideas coming in concerning how we use our bathrooms, it’s only a matter of time before the bathroom is as regularly remodeled as the kitchen.


·      Soaking Tubs:

It used to be that when a homeowner had some extra money to spend, a Jacuzzi was one of the first things on the wish list. Jacuzzis are still a solid, fun investment but they can be a bit obtrusive. So, think about getting a special soaking tub in your bathroom. They are deeper than normal tubs and look incredibly stylish, offering the perfect place to relax with a book and a glass of wine or to simply zone out for an hour. Most salesmen or contractors will be able to help you plan where you could possibly place the tub most conveniently.

·      Big Showers:

The act of taking a bath has gone down in popularity, largely due to green concerns about inflated water usage. Showers are now the key component of any bathroom, along with your toilet. A recent home improvement trend is to make the shower bigger, more stylish and more spacious. Making your shower larger gives off the feeling of a top-grade spa, allotting more room to enjoy the steam and even take a seat. Some contractors have even started to take out the doors, glass and tubs, centering the entire bathroom on a drain in the middle of the room. This feeds into a growing trend towards porcelain and stone tiles in bathrooms, though this isn’t recommended if you are thinking about selling your house in the near future.

·      Heat & Steam:

Steam baths, which essentially work like a sauna, are coming up in a big way and though they are a bit pricey (north of $1,500), it isn’t a bad idea if you treasure your alone time in the bathroom. This also adds to that spa feeling I mentioned before. Another big idea has been to put mesh under your tiles and connecting it to thermostat to ensure warm floors and a more comfortable experience for your bare feet.

·      Tear Down the Walls:

The aforementioned idea of breaking down the walls to create a shower as a main component of the bathroom may be a bit adventurous or daunting to some. In this case, if you want to get a bit more private, think about building a separate, enclosed area for your toilet, not completely unlike a stall but more soothing and personal. If you’re a tech person or just an entertainment hound, you might even think about putting a small flat screen on the back of the door, allowing for you to watch the latest episode of Glee or a recent Brad Pitt movie as you handle your business.

The landscape of the home has become more and more personalized as the years have gone on and the bathroom is no different from the kitchen or the bedroom in this regard. As in most things, it is a determination that depends largely on room, as my favorite of the lot – the soaking tub – is best in a more open bathroom, whereas making your shower bigger is something that nearly any homeowner could benefit from.

For me, the soaking tub is a home improvement project that offers both a sensible source of leisure that can add to the value of your home and help you rethink the design of your bathroom. That being said, any of the aforementioned additions can fill similar roles, depending on the individual, and each one helps redefine the bathroom as room deserving of thought and not just a place to, er, take care of business.

Wednesday, September 21, 2011

Lauren Liess Textiles Shoot

I have pictures back from our photo shoot at Helen Norman's farm!!  Helen & her assisitant F.J. are still working on the photos (we're going for a sort of vintage/ edgy vibes for the photographs so it takes a lot of processing afterwards) but I though I'd share a few peeks - some without the processing.

Our goal with this photoshoot was to show the fabrics in a variety of settings, both with and whithout people.  We wanted to show how the fabrics move and look and feel.  I washed some of the fabrics before the shoot to give them a bit of patina and I really love how they turned out.  Some of the photos and fabrics come across as fresh and happy & fun, while others are earthier,  moodier or softer.   We wanted to show the variety of feelings & moods that couls be created with the line. (55 fabrics in total with 14 different designs.)

Here's part of our gold/ yellow collection on a beautiful antique daybed with little Grizzly taking a nap to show they really are comfy:


{Fabrics pictured: Magnolia in Yellow, Live Paisley in Gold, and Fern Star in Yellow}


Our boys were sooooo good and put up with so much.  Here's an outtake of them, totally at the end of their ropes:

{Pretending to nap on a blanket in Magnolia}

I love this photo with the mist on the door to the porch:


We woke up super-early and got some cool pics with fog in the background:

{me with a Wild Chicory blanket}

I looooove this outtake...  Did you ever play this game with friends when you were little?-

{"Super tall 4 year-old.. ie Christian on Daddy's shoulders.  And Kelly Green Cape in Happikat}


{Laundry Line with: Thistle in Sepia, Live Paisley in Antique Beige and Squircles in Fog}

...Anyway, I have so many more pics to share (I think 85 total?!!  We took over 1,000!) but I really want you to see them once they have that processing I mentioned.  I'm finishing up loading the plain fabric photos onto my online store and will then go back & add in the lifestyle photos & then we'll be ready to launch.  We're all moving as quickly as we can!! :)

I can't thank Helen & F.J. enough for the photos & their time,  and of course thank you to my family.  (I know two of you can't read yet, but I love you more than anything and one day you'll get what a big deal this was to me.)


xoxo, Lauren

If you'd like help creating a home you absolutely love, contact me about our design services.